Google Compute Platform
To Signup to Google Compute Platform you will require a Gmail account or a corporate Gmail based account.
To create a Google Account navigate to https://accounts.google.com/SignUp
Once you have a Google Account you can use this to manage a Google Compute Platform https://console.cloud.google.com/compute/
You maybe entitled to a Free trial, the trial account has a variety of limitations such as CPU and Storage.
Create Virtual Machine
From the Compute menu you will be able to create a Virtual Machine (VM), if you do not have any existing Virtual Machines you will see the following, otherwise you will see standard Create Instance
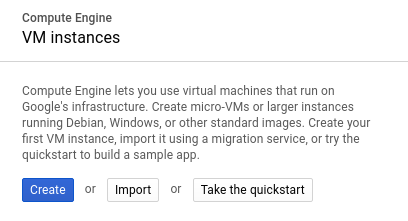
Click the Create button to continue
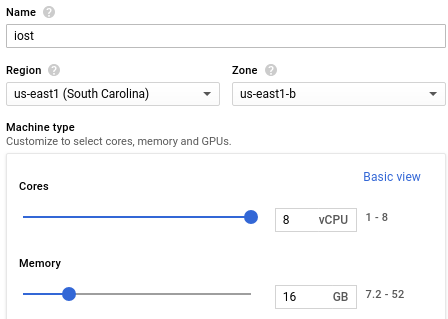
Next you will need to give your node a name, Region, Zone and Configure the Size. In the following example we have customized the instance to match the minimum recommeded size which is
- 8 Cores
- 16 GB memory
You should give your instance a name that is distinguisable to you as well as a Region, it is recommended you choose a region that is nearer to your geographical location as this will help decentralize the IOST platform.
Boot Disk
Scroll down until you see Boot disk, click Change (the default type is Debian GNU/Linux 9). Select CentOS 7
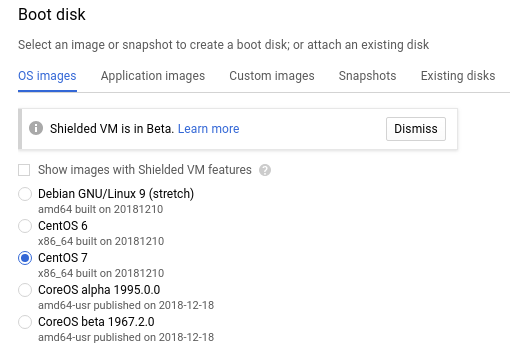
Scroll down to the bottom for Size and change 10 to a minimum of 100, you can choose more if you prefer and this can be extended in the future if necessary.

Once you have configured these two parameters hit Select at the bottom of the page, you are returned to the New VM instance main page and will see the following

Firewall
From the initial creation of the instance you are not able to add the necessary firewall rules, this will be done after the server is online
Management
Just below the Firewall section you will see the Management, security, disks, networking, sole tenancy , click on this to show more

From the Management tab you will be able to create an Automation script, this helps to simplify some of your work, see https://cloud.google.com/compute/docs/startupscript for more information
Please refer to Deployment Docker Centos for where this script is derived from
Please note this script also attempts to attach your data disk, this script is not intended to be run multiple times , please Remove it after first initialization.
#! /bin/bash
yum update -y
yum install -y yum-utils device-mapper-persistent-data lvm2
yum-config-manager --add-repo https://download.docker.com/linux/centos/docker-ce.repo
yum install -y https://centos7.iuscommunity.org/ius-release.rpm
yum install -y git2u docker-ce
curl -s https://packagecloud.io/install/repositories/github/git-lfs/script.rpm.sh | sudo bash
curl -L "https://github.com/docker/compose/releases/download/1.23.1/docker-compose-$(uname -s)-$(uname -m)" -o /usr/local/bin/docker-compose
chmod 755 /usr/local/bin/docker-compose
git clone https://github.com/iost-official/go-iost && cd go-iost
git checkout v2.1.0
systemctl enable docker
systemctl start docker
mkfs.xfs /dev/sdb
mkdir -p /data/
mount /dev/sdb /data/
mkdir -p /data/iserver
mkdir -p /data/docker
cat <<EOF> /data/iserver/iserver.yml
acc:
  id: IOSTfQFocqDn7VrKV7vvPqhAQGyeFU9XMYo5SNn5yQbdbzC75wM7C
  seckey: 1rANSfcRzr4HkhbUFZ7L1Zp69JZZHiDDq5v7dNSbbEqeU4jxy3fszV4HGiaLQEyqVpS1dKT9g7zCVRxBVzuiUzB
  algorithm: ed25519
genesis: /var/lib/iserver/genesis.yml
vm:
  jspath: vm/v8vm/v8/libjs/
  loglevel: ""
db:
  ldbpath: /var/lib/iserver/storage/
p2p:
  listenaddr: 0.0.0.0:30000
  seednodes:
    - /ip4/35.176.129.71/tcp/30000/ipfs/12D3KooWSCfx6q7w8FVg9P8CwREkcjd5hihmujdQKttuXgAGWh6a
  chainid: 1024
  version: 1
  datapath: /var/lib/iserver/p2p/
  inboundConn: 15
  outboundConn: 15
  blackPID:
  blackIP:
  adminPort: 30005
rpc:
  gatewayaddr: 0.0.0.0:30001
  grpcaddr: 0.0.0.0:30002
log:
  filelog:
    path: /var/lib/iserver/logs/
    level: info
    enable: true
  consolelog:
    level: info
    enable: true
  asyncwrite: true
metrics:
  pushaddr:
  username:
  password:
  enable: false
  id: iost-mainnet:visitor00
debug:
  listenaddr: 0.0.0.0:30003
version:
  netname: "debugnet"
  protocolversion: "1.0"
EOF
cat <<EOF > /data/iserver/genesis.yml
creategenesis: true
tokeninfo:
  foundationaccount: foundation
  iosttotalsupply: 21000000000
  iostdecimal: 8
  ramtotalsupply: 9000000000000000000
  ramgenesisamount: 137438953472
witnessinfo:
  - id: producer00000
    owner: IOST22xmaHFXW4D2LCuC9gU1qt4mQss8BucMqMpFqeq9M2XSxYa7rF
    active: IOST22xmaHFXW4D2LCuC9gU1qt4mQss8BucMqMpFqeq9M2XSxYa7rF
    balance: 1000000000
  - id: producer00001
    owner: IOST25NTSxZ9rWht235FyN9XWwWx1cXqr9EyQrmxMzdr5sebmvrkA4
    active: IOST25NTSxZ9rWht235FyN9XWwWx1cXqr9EyQrmxMzdr5sebmvrkA4
    balance: 1000000000
  - id: producer00002
    owner: IOSTowEse8dXYV7cSM7y8VMCWsvWnZAKDc9GmW9yGyBihphVMhbSF
    active: IOSTowEse8dXYV7cSM7y8VMCWsvWnZAKDc9GmW9yGyBihphVMhbSF
    balance: 1000000000
  - id: producer00003
    owner: IOST24cF7DSTjLoZwDmQ7UpQ5pim7eQtFxKy8fh1w4zoezp5YSJ5kF
    active: IOST24cF7DSTjLoZwDmQ7UpQ5pim7eQtFxKy8fh1w4zoezp5YSJ5kF
    balance: 1000000000
  - id: producer00004
    owner: IOSTP336SxjTL7epFvjC3Te5srxbcdXtd7PmQJo6432uTULapqniQ
    active: IOSTP336SxjTL7epFvjC3Te5srxbcdXtd7PmQJo6432uTULapqniQ
    balance: 1000000000
  - id: producer00005
    owner: IOST2wiZ98sq3QHa7vpmf9qg1CTYu3NZCcZhD179hWWV2YGx6MgpiH
    active: IOST2wiZ98sq3QHa7vpmf9qg1CTYu3NZCcZhD179hWWV2YGx6MgpiH
    balance: 1000000000
  - id: producer00006
    owner: IOSTjcx7BVrHJC27QtqurRpqAzWH2diHgzFRPZG3artfUU2u7uisQ
    active: IOSTjcx7BVrHJC27QtqurRpqAzWH2diHgzFRPZG3artfUU2u7uisQ
    balance: 1000000000
contractpath: contract/
admininfo:
  id: admin
  owner: IOST2DWhdDHz8kjExZNH2gmWYnbJBrfVMUPwLDnmZRstT47EsEgZzb
  active: IOST2DWhdDHz8kjExZNH2gmWYnbJBrfVMUPwLDnmZRstT47EsEgZzb
  balance: 14000000000
foundationinfo:
  id: foundation
  owner: IOST2DWhdDHz8kjExZNH2gmWYnbJBrfVMUPwLDnmZRstT47EsEgZzb
  active: IOST2DWhdDHz8kjExZNH2gmWYnbJBrfVMUPwLDnmZRstT47EsEgZzb
  balance: 0
initialtimestamp: "2006-01-02T15:04:05Z"
EOF
cat <<EOF> /data/docker/docker-compose.yml
version: "2.2"

services:
  iserver:
    image: iostio/iost-node:2.1.0
    restart: always
    ports:
      - "30000:30000"
      - "30001:30001"
      - "30002:30002"
      - "30003:30003"
    volumes:
      - /data/iserver:/var/lib/iserver
EOF
cd /data/docker
docker-compose up -d
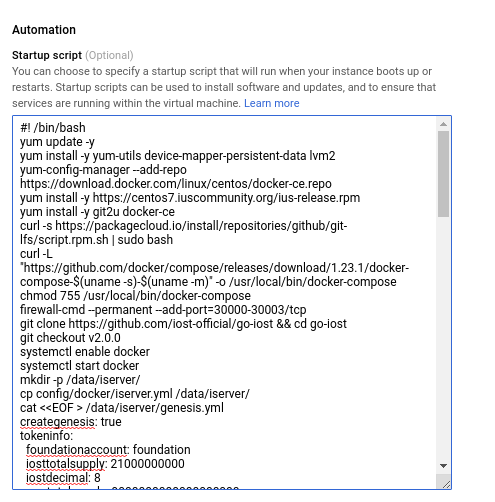
Once you populate this form it will look like
Disks
Navigate to Disks tab and click Add new disk

Next specify a Name and Size, please note that you will not be able to create disks in your region over 2048 GB if you are on a trial account or without requesting a quota increase.
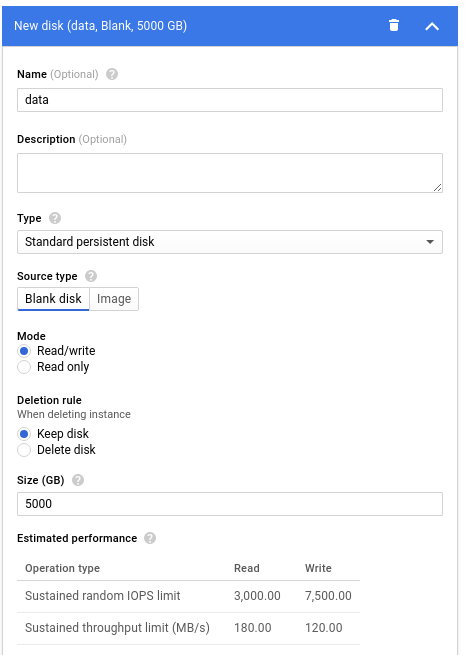
At this point you can press the Create button at the bottom of the page to initiate the deployment of the virtual machine
Firewall
Click on the name of your instance, this will bring you to VM instance details page , click the 3 little dots and click Network Details , on the left navigate to Firewall rules
Click on Create Firewall Rule , give the rule a name

Next you must specify the Target, Source and Destination ports, you could specify the target specifically being the service acccount linked to your current instance (more secure) but this example opens it up for all VM's in the VPC for simplicity.
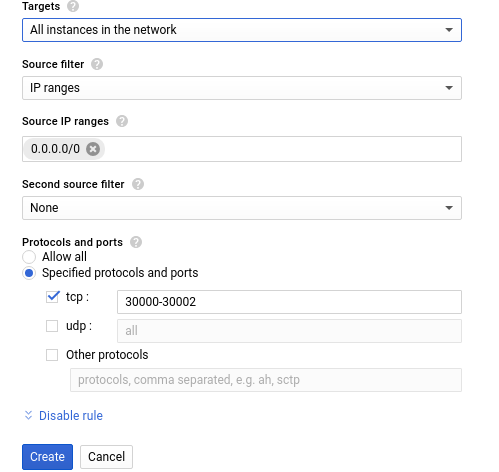
Click Create and you should now see the following rule

To get back to your VM instance you must now click on the 3 lines beside Google Cloud Platform and navigate to Compute Engine , VM Instannces
Verify Instance
From the Compute console you will now see your node running, it will display your internal and external IP as well as option to connect via SSH, select Open in browser window which will connect from within the Google Compute Platform directly without the need to open SSH port to the Internet or to a defined IP.

From the console you can become root and check some logs
sudo su -
docker ps
tail -f /data/iserver/logs/iost.log
You should see blocks syncing

You may need to restart docker container if it was started before you applied the firewall rules in the VPC. Ensure you are in directory where docker-compose.yml exists.
docker-compose restart iserver
You may also need to change your account number in /data/iserver/iserver.yml if you are running a Servi Node
To check your node is syncing run the following command look for the headBlock being increased `` docker exec -ti 1234abcd bash ./iwallet state
To check your node is up query a seednode and look for your public ip
docker exec -ti 1234abcd bash ./iwallet state -s 35.176.127.71:30002 | grep 35.246.82.51 ``
The following output should be visible , ensure your port shows 30000

Remotely from another server you should also be able to retrieve a socket connection running telnet
telnet 35.246.82.51 30000
